
Stunning March Nail Inspo for Spring Chic

– March Nail Inspo for Spring Chic
**Bold Colors**
– **Vibrant hues:** Embrace the energy of spring with bright shades like emerald green, cobalt blue, or fuchsia.
– **Pastels:** Soften the bold colors with pastel versions for a touch of sweetness, such as lavender, baby pink, or mint.
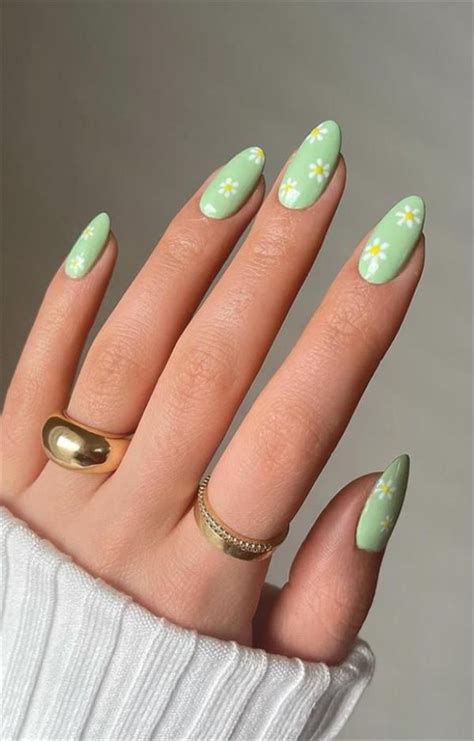
**Floral Designs**
– **Intricate blooms:** Paint delicate flower petals on a nude base for an elegant and feminine look.
– **Abstract florals:** Create a more modern take on florals with abstract brushstrokes or geometric shapes inspired by nature.
**Negative Space**
– **Unpainted areas:** Leave portions of your nails bare to create a negative space that emphasizes the design.
– **Cut-out details:** Use a nail art brush to create intricate cut-out designs that frame the painted areas.
**Marble and Geode**
– **Swirly patterns:** Replicate the beauty of marble or geodes with swirling designs in multiple shades of polish.
– **Metallic highlights:** Add a touch of glamour to your marble or geode nails with metallic highlights or gold leaf.
**Animal Prints**
– **Leopard spots:** Embrace the wild side with leopard spots in neutral shades or bright colors.
– **Zebra stripes:** Create a chic and minimalist look with vertical or horizontal zebra stripes.
**Metallic Accents**
– **Gold and silver:** Add a touch of sophistication to your nails with gold or silver accents.
– **Foil art:** Apply nail foil in various colors or patterns to create a metallic effect.

– Embrace Floral Delights
Spring is in the air, and that means it’s time to embrace floral delights in all their glory! From delicate petals to bold blooms, there’s a floral nail art design to suit every taste.
Here are a few ideas to get you started:
- Classic florals: Paint your nails with a light pink or white base, then add dainty flowers in soft colors like lavender, blue, or yellow.
- Bold blooms: Go for a more dramatic look with bright, bold flowers in colors like red, orange, or purple.
- Metallic florals: Add a touch of glamour to your nails with metallic flowers. Gold, silver, or copper flowers will look especially chic.
- 3D florals: Create a more realistic look with 3D flowers. You can use nail art supplies like beads, rhinestones, or acrylic paint to create your own 3D flowers.
- Watercolor florals: Create a soft, dreamy look with watercolor florals. Use light, watery colors to create a delicate, ethereal effect.
No matter what your style, there’s a floral nail art design that’s perfect for you. So get creative and have fun with your nails this spring!

– Blooming Beauties: Pastel Perfection
Embrace the charm of this season with a breathtaking nail art design that combines soft pastel hues with the delicate beauty of blooming flowers. These Pastel Perfection Nails offer an ethereal touch to your fingertips, making them the perfect canvas for showcasing the colors of spring.
To recreate this enchanting look, start with a base coat of your choice. Choose a pastel shade that complements the flower design, such as a soft pink, lavender, or baby blue. Let the base coat dry completely before applying the floral details.
Using a fine-tipped nail art brush, create delicate flower petals with a slightly darker shade of the base color. Begin with a small dot, then gently pull the brush outwards to form the petal shape. Repeat the process to create multiple petals, arranging them to resemble a blooming flower.

– Spring Showers Bring Ombre Flowers
Spring is finally here, and with it comes the beautiful blooms of flowers. Celebrate the arrival of the season by giving your nails a fresh, floral update with ombre flowers. This easy-to-follow technique will create a unique and eye-catching look that is perfect for any occasion.
What you’ll need:
- A base coat
- Several shades of nail polish (we recommend using at least three)
- A makeup sponge
- A top coat
Instructions:
- Start by applying a base coat to your nails. This will help to protect your nails and prevent the polish from chipping.
- Choose three shades of nail polish that you want to use for your ombre flowers. We recommend using a light color for the base, a medium color for the middle, and a dark color for the tips.
- Apply the lightest color of nail polish to the entire nail.
- Dab a small amount of the medium color of nail polish onto a makeup sponge.
- Gently dab the makeup sponge onto the nail, starting at the base of the nail and working your way up to the tips. The color will gradually blend with the light color at the base of the nail.
- Repeat steps 4 and 5 with the darkest color of nail polish, blending it with the medium color.
- Once you have created your ombre flowers, apply a top coat to seal in the design.
Here are some additional tips for creating ombre flowers on your nails:
- Use a light hand when blending the colors together. You don’t want the colors to be too harsh or muddy.
- If you want to create a more dramatic look, you can add a few small dots of nail polish to the center of the flowers.
- You can also use a toothpick or a dotting tool to create small details on the flowers, such as petals or leaves.
With a little practice, you can create beautiful ombre flowers on your nails that will turn heads all season long.

– Geometric Grace: Edgy Minimalism
This season, embrace the allure of geometric grace with edgy minimalist nail art designs that exude both sophistication and modernity. These sharp, clean lines and bold shapes create a captivating visual impact, elevating your nails to a work of art.
Asymmetrical Elegance:
Experiment with asymmetrical geometric patterns that break away from traditional symmetry. Create intriguing designs by combining triangles, squares, and rectangles in off-center compositions.
Negative Space Artistry:
Incorporate negative space into your geometric designs, allowing the natural nail to peek through. This juxtaposition creates a sense of depth and balance, adding a touch of intrigue.
Metallic Accents:
Elevate your geometric manicures with metallic accents. Thin stripes or geometric shapes in gold, silver, or copper add a touch of glamour and sophistication.
Holographic Embrace:
Embrace the ethereal beauty of holographic polishes in geometric designs. The iridescent finish creates a mesmerizing effect, catching the light and enhancing the sharpness of the lines.
Matte Sophistication:
Opt for a matte finish to add a touch of modern elegance to your geometric nails. The velvety texture adds depth and creates a chic, understated look.

– French with a Twist: Modern Elegance
The French manicure is a classic for a reason: it’s elegant, timeless, and goes with everything. But if you’re looking for a way to update your French manicure, there are plenty of modern twists you can try.
1. **French with a colored tip**. Instead of the traditional white tip, try using a different color, such as black, navy, or burgundy. This will give your French manicure a more modern and edgy look.
2. **French with a glitter tip**. Add some sparkle to your French manicure by using glitter on the tips. This is a great way to dress up your nails for a special occasion.
3. **French with a negative space tip**. Negative space is the area of the nail that is left unpainted. This can create a very modern and minimalist look. To create a negative space French manicure, simply paint the base of your nails and leave the tips unpainted.
4. **French with a metallic tip**. Metallic tips are a great way to add some glam to your French manicure. You can use gold, silver, or rose gold.
5. **French with a holographic tip**. Holographic tips are a great way to create a unique and eye-catching look. These tips are made with a special holographic polish that creates a rainbow effect.
No matter what style you choose, a French with a twist is sure to turn heads. So next time you’re looking for a new nail look, give one of these modern twists a try.

– Shimmering Seas: Aquatic Hues & Accents
Dive into the Depths with Aquatic Hues
Embrace the mesmerizing beauty of the ocean with a palette of blues, greens, and teals. From deep sapphire to vibrant turquoise, select shades that evoke the serene depths of the sea.
Shimmering Accents: Catch the Light
Add a touch of glamour with shimmering accents. Choose iridescent chrome, holographic glitters, or ultra-fine shimmers to capture the sun’s rays and create an eye-catching effect that reflects the shimmering surface of the water.
Coral and Seaweed Details
Incorporate intricate coral and seaweed designs to bring a touch of marine life to your nails. Use delicate brushstrokes to create realistic textures and patterns that mimic the organic beauty of the ocean floor.
Seashell Embellishments
Add a touch of elegance with seashell embellishments. Carefully glue tiny seashells to your nails, creating a playful and coastal vibe that evokes the serenity of a seaside escape.
Jellyfish Nails
Channel the ethereal grace of jellyfish with a unique nail art technique. Apply a gradient of colors to create a translucent effect and use thin, brushstrokes to draw jellyfish-like arms, capturing their delicate movement.
Wave Patterns
Paint freehand wave patterns on your nails to mimic the gentle flow of the sea. Use an ombre effect to create a sense of depth and movement, portraying the ever-changing beauty of the ocean’s surface.

– Abstract Expressions: Artistic Masterpieces
The world of nail art has become increasingly sophisticated in recent years, and abstract expressionism is one of the most popular trends. This style of nail art is characterized by its use of bold colors, geometric shapes, and gestural brushstrokes. Abstract expressionist nail art can be simple or complex, and it can be used to create a variety of different looks.nbsp;
One of the most popular abstract expressionist nail art techniques is color blocking. This technique involves using two or more contrasting colors to create a bold, graphic look. Color blocking can be used to create a variety of different patterns, such as stripes, checkers, and polka dots.nbsp;
Another popular abstract expressionist nail art technique is splatter painting. This technique involves using a brush to flick paint onto the nails. Splatter painting can create a variety of different effects, from subtle to dramatic.nbsp;
Abstract expressionist nail art can also be used to create more complex designs, such as landscapes, portraits, and abstract patterns. These designs are often created using a variety of different techniques, such as brushstrokes, sponging, and stamping.nbsp;
Abstract expressionist nail art is a great way to add a touch of personality to your look. This style of nail art is versatile and can be used to create a variety of different looks, from simple to complex. Whether you’re looking for a subtle way to add some color to your nails or you want to create a more dramatic work of art, abstract expressionist nail art is a great option.

– Celestial Serenity: Starry Night Nails
Indulge in the ethereal beauty of the night sky with Celestial Serenity: Starry Night Nails. This enchanting nail art trend evokes the mesmerizing allure of twinkling stars and moonlit wonder, inviting you into a realm of cosmic dreams.
Begin with a base coat of midnight blue or deep purple, representing the vast expanse of the night sky. To create the celestial tapestry, use a fine-tipped brush and white nail polish to paint delicate stars and crescent moons on the surface.
Add a touch of cosmic shimmer with holographic or iridescent nail polish. Apply sparingly on the tips of the stars and around the moon, enhancing their celestial glow. You can also incorporate subtle gradients of blue and purple to create a realistic night sky atmosphere.

– Tropical Getaway: Vibrant Escape
Let your fingers do the travelling with these vibrant and chic Tropical Getaway nail ideas. These designs will have you dreaming of swaying palm trees, crystal clear waters, and sugary soft sands.
1. Sunset Skies: Paint your nails a gradient of orange, pink, and purple to create a beautiful sunset sky. Add some gold glitter to the tips for a touch of sparkle.
2. Palm Tree Paradise: Paint a palm tree on each nail. Use a dark green for the trunk and a light green for the leaves. Add some white clouds and a blue sky for the background.
3. Tropical Flowers: Create a tropical flower design by painting different colored flowers on each nail. Use bright colors like pink, yellow, orange, and blue. Add some green leaves for a touch of realism.
4. Sea Turtle Symphony: Paint a sea turtle on each nail. Use a light green for the body and a dark green for the shell. Add some yellow highlights and black dots for the eyes.
5. Beachy Blues: Paint your nails a light blue. Add some white waves and a few yellow seashells. You can also add some glitter or rhinestones for a touch of sparkle.
These are just a few ideas to get you started. With a little creativity, you can come up with your own unique tropical getaway nail designs. So get ready to escape to paradise, one nail at a time.

– Metallic Moons: Celestial Glamour
Indulge in the mesmerizing allure of metallic moons, a celestial trend that transforms nails into enchanting canvases. This ethereal nail art technique paints half-moon shapes near the cuticles, creating an alluring contrast between the metallic sheen and the natural nail bed. The result is a captivating celestial glamour that transports you to a realm of stars and moonbeams.
1. Moonlit Silver: Embrace the timeless elegance of silver metallic moons. Pair them with a sheer or pastel base color for a subtle yet striking look.
2. Golden Halo: Paint your nails with a vibrant metallic gold polish and create contrasting half-moons. Add a touch of stardust with holographic or iridescent accents.
3. Cosmic Copper: Channel the warmth of the celestial sky with copper metallic moons. Combine them with nude or earthy tones to create a harmonious look.
4. Celestial Blues: Capture the ethereal beauty of the night sky with navy or cobalt blue metallic moons. Add subtle shimmer or glitter to evoke distant galaxies.
5. Moonstone Magic: Mimic the iridescent glow of moonstones with pearlescent or opalescent metallic moons. Pair them with muted colors for a soft and ethereal effect.
6. Metallic Mix: Experiment with combining different metallic hues for a multidimensional look. Create a harmonious gradient or alternate between contrasting colors for a dynamic design.
7. Starry Nights: Take inspiration from the twinkling night sky and adorn your nails with metallic moons and tiny star-shaped embellishments. Use black or navy polish as a base for a celestial backdrop.
8. Ombre Moons: Create a soft and romantic effect by blending metallic moon shapes with a gradient base color. Use shades that transition from light to dark or vice versa.
Embrace the celestial glamour of metallic moons and let your nails become a canvas for cosmic enchantment. Indulge in these ethereal designs and transport your nails to a realm beyond the ordinary.