
Sourdough Starter Feeding Schedule Made Easy

1. Understanding the Importance of Feeding Your Sourdough Starter
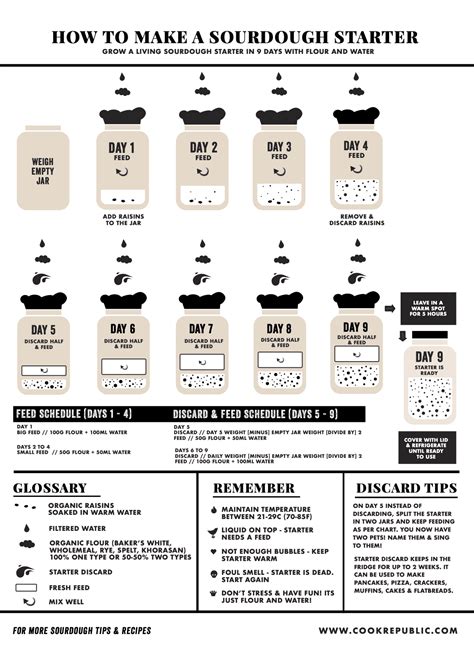
Your sourdough starter is a living colony of beneficial bacteria and yeast that you nurture to make delicious, healthy sourdough bread. Just like any living organism, your starter must be fed regularly to stay alive and active. Feeding will provide your starter with the building blocks it needs to continue producing the lactic acid and carbon dioxide that give sourdough bread its characteristic tang and rise.
The frequency with which you feed your starter will depend on the ambient temperature. In general, starters should be fed daily in warm weather and twice a week in cool weather. If you’re not sure how often to feed your starter, it’s always better to err on the side of feeding it more often.
To feed your starter, simply discard half of it and then add equal parts flour and water to the remaining starter. Stir well until the new flour and water are fully incorporated. Then, cover your starter and let it sit at room temperature for several hours before refrigerating it.
Feeding your sourdough starter is an essential part of keeping it healthy and active. By following a regular feeding schedule, you can ensure that your starter will always be ready to bake delicious sourdough bread.

2. Choosing the Right Feeding Schedule for Your Needs
Once you have a sourdough starter, you need to choose a feeding schedule that fits your needs. The frequency with which you need to feed your starter will depend on a number of factors such as the temperature of your environment, the type of flour you are using, and how active your starter is.
If you’re just starting out, it is best to feed your starter frequently. This will help to keep it active and healthy. Once your starter is more established, you can feed it less frequently. Some people even choose to only feed their starter once a week or even once a month.
Here are some tips for choosing the right feeding schedule for your needs:
Ultimately, the best way to determine is to experiment and see what works best for you and your starter. There is no one-size-fits-all approach to feeding a sourdough starter.

3. Establishing a Consistent Feeding Routine
Once you have a healthy, bubbly starter, it’s important to establish a consistent feeding routine to keep it active and strong. The best way to do this is to feed your starter on a regular schedule, **at the same time each day**. This will help to regulate the starter’s fermentation process and ensure that it develops a consistent flavor.
The frequency with which you need to feed your starter will depend on the temperature of your kitchen. In warm weather, you may need to feed your starter every day or two. In cooler weather, you can feed it less often, perhaps every 3-5 days.
When you feed your starter, it’s important to use a ratio of 1:1:1. This means that you should use equal parts starter, flour, and water. For example, if you have 1 cup of starter, you would add 1 cup of flour and 1 cup of water. Stir the mixture well and let it sit at room temperature for 6-12 hours.

4. **Calculating the Correct Feeding Ratio**
The feeding ratio refers to the proportion of starter to flour and water added during each feeding using the formula:
New starter = (Original starter + Flour + Water)
For example, a 1:1:1 ratio means equal parts starter, flour, and water by weight. A 1:2:2 ratio means one part starter to two parts flour and water each.
The feeding ratio determines the starter’s activity level, acidity, and flavor profile:
- Higher ratios (e.g., 1:10:10) produce a more active starter that requires frequent feedings but has a milder flavor.
- Lower ratios (e.g., 1:2:2) result in a less active starter that can go longer between feedings but develops a stronger flavor.
The ideal feeding ratio varies depending on the desired outcome and the ambient temperature. As a general rule, cooler temperatures require lower feeding ratios, while warmer temperatures necessitate higher ratios.

5. Feeding Techniques: Stirring, Folding, & Kneading
**Stirring** is the simplest feeding technique and is suitable for new starters. Simply mix the starter, water, and flour until well combined. This method is quick and easy, but it can result in a starter that is slightly less active than starters that are folded or kneaded.
**Folding** is a more involved feeding technique that helps to develop a stronger starter. To fold a starter, first mix the starter, water, and flour until well combined. Then, use a spatula to fold the edges of the starter over the center. Repeat this process several times until the starter is smooth and elastic.
**Kneading** is the most time-consuming feeding technique, but it can result in the most active starter. To knead a starter, first mix the starter, water, and flour until well combined. Then, turn the starter out onto a lightly floured surface and knead for 5-10 minutes, or until the starter is smooth and elastic. Kneading helps to develop the gluten in the flour, which gives the starter its strength.
**No matter which feeding technique you choose, it is important to be consistent. Feed your starter at the same time each day and use the same proportions of flour and water. This will help to keep your starter healthy and active.

6. Observing Your Starter’s Activity Level
Your starter’s activity level is an important indicator of its health and readiness to use. Here are some signs to look for when observing your starter’s activity level:
A healthy, active starter will double in size within 12 hours or less of feeding. If your starter is not doubling in size, it may need to be fed more often or with a higher ratio of flour to water.
The starter should have a bubbly and foamy surface. This indicates that the yeast and bacteria are actively fermenting the flour and water. If your starter does not have a bubbly surface, it may be too cold or dry.
The starter should have a slightly sour smell. This is a normal byproduct of the fermentation process. If your starter smells strongly acidic or rancid, it may have gone bad and should be discarded.
By observing your starter’s activity level, you can ensure that it is healthy and ready to use for baking bread.

7. Adjusting the Feeding Schedule as Needed
As your starter matures, you may find that it needs to be fed more or less often. Here are some signs that your starter needs to be fed more often, such as:**
*
- The starter is rising and falling more quickly than usual.
- The starter smells sour or yeasty.
- The starter is separating into a watery layer and a thick layer.
If you notice any of these signs, try feeding your starter more often. You can also increase the amount of food you give it each time you feed it.
Here are some signs that your starter needs to be fed less often, such as:**
*
- The starter is not rising and falling as much as usual.
- The starter smells sweet or alcoholic.
- The starter is very thick and sticky.
If you notice any of these signs, try feeding your starter less often. You can also decrease the amount of food you give it each time you feed it.
Ultimately, the best way to determine how often to feed your starter is to observe it and see how it responds. With a little trial and error, you’ll be able to find a feeding schedule that works well for you and your starter.

8. Storage Options for Your Sourdough Starter
Keep your sourdough starter in the refrigerator.
This is the best way to store your sourdough starter for long periods of time. When you’re ready to use it, take it out of the refrigerator and let it come to room temperature for several hours before feeding it.
Keep your sourdough starter in a cool, dark place.
If you don’t have room in your refrigerator, you can store your sourdough starter in a cool, dark place, such as a pantry or basement. This will help to slow down the growth of bacteria and yeast, but your starter will still need to be fed regularly.
Freeze your sourdough starter.
If you’re going to be away for an extended period of time, you can freeze your sourdough starter. To do this, divide your starter into small portions and freeze them in airtight containers. When you’re ready to use it, thaw it overnight in the refrigerator and then feed it.

9. Troubleshooting Common Sourdough Starter Problems
### Sourdough starter is not rising
> – **Possible cause:** Starter isn’t active.
>* **Solution:** Feed the starter daily according to the feeding schedule.
>- **Possible cause:** The starter might be too wet or too dry.
>* **Solution:** Add more flour or water in small amounts to achieve the right consistency and feed the starter regularly.
>- **Possible cause:** The starter might be too cold.
>* **Solution:** Cold temperatures can slow down the fermentation process. Place the starter in a warm spot with a stable temperature between 75-85°F (24-29°C)
### Sourdough starter smells bad
> – **Possible cause:** The starter might be contaminated.
>* **Solution:** Discard the starter and start over with fresh ingredients.
>- **Possible cause:** The starter might be too acidic.
>* **Solution:** Feed the starter more regularly to reduce acidity.
### Sourdough starter has a pink or green tint
> – **Possible cause:** The starter might be contaminated with mold or bacteria.
>* **Solution:** Discard the starter and start over with fresh ingredients.
### Sourdough starter is forming hooch
> – **Possible cause:** The starter is overfed and has produced excess alcohol and carbon dioxide.
>* **Solution:** Pour off any excess liquid. Feed the starter less frequently and use it more regularly in recipes.

10. The Benefits of a Healthy Sourdough Starter
A healthy sourdough starter is a thriving ecosystem of beneficial bacteria and yeasts. These microorganisms work together to create a sourdough starter that is both flavorful and nutritious. Here are 10 benefits of a healthy sourdough starter:
1. Improved Digestion: The lactic acid bacteria in sourdough starter helps to break down complex carbohydrates, making them easier to digest. This can be especially beneficial for people with digestive issues such as IBS or Crohn’s disease.
2. Increased Nutrient Absorption: The fermentation process in sourdough starter breaks down phytic acid, which is a compound that can inhibit the absorption of certain minerals such as iron and zinc.
3. Reduced Blood Sugar Spikes: Sourdough bread has a lower glycemic index than bread made with commercial yeast. This means that it causes a slower and more gradual rise in blood sugar levels, which is beneficial for people with diabetes or hypoglycemia.
4. Rich in Antioxidants: Sourdough starter contains high levels of antioxidants, which can help to protect cells from damage and reduce the risk of chronic diseases such as cancer and heart disease.
5. Contains Beneficial Bacteria: Sourdough starter is a source of beneficial bacteria, which can help to improve gut health and boost the immune system.
6. Anti-inflammatory Properties: The lactic acid bacteria in sourdough starter have anti-inflammatory properties, which can help to reduce inflammation throughout the body.
7. Improved Shelf Life: Sourdough bread made with a healthy starter has a longer shelf life than bread made with commercial yeast. This is because the lactic acid bacteria in the starter inhibit the growth of mold and bacteria.
8. Unique Flavor and Aroma: Sourdough bread has a unique flavor and aroma that is due to the fermentation process. The flavor of sourdough bread can vary depending on the type of flour and starter used.
9. Versatile Ingredient: Sourdough starter can be used to make a variety of breads, pastries, and other baked goods. It can also be used as a leavening agent in pancakes, waffles, and other batter-based foods.
10. Sustainable: Sourdough starter can be propagated indefinitely, which means that you can always have a fresh supply of sourdough starter on hand. This is a more sustainable option than using commercial yeast, which is produced using a process that requires fossil fuels.

