
Easter Bunny Crafts: Hop Into the Fun

1. Introduction: Embracing the Easter Spirit through Creative Bunny Crafts
As the vibrant colors of spring paint the world around us, it’s time to embrace the joyous spirit of Easter. This year, let’s put our creativity to work and welcome the festive season with adorable bunny crafts. From charming decorations to whimsical toys, these ideas will bring the magic of Easter into your homes and hearts.
For those with a knack for papercraft, intricate bunny silhouettes can transform ordinary windows into Easter-themed masterpieces. With a few snips and folds, you can create hopping bunnies that dance upon the glass, bringing smiles to passersby.
If you fancy some needlework, why not stitch up cheerful bunny pillows? Soft and cuddly, these adorable creations will add a touch of Easter cheer to any room. Patterns range from simple silhouettes to intricate designs, so you can choose a level of complexity that suits your abilities.

2. Materials for Hopping into Easter Bunny Creations
To craft your own adorable Easter bunnies, you’ll need a few basic materials:
Fabric: Choose a soft, plush fabric in white or cream for the bunny’s body and ears. For embellishments, you can use colorful fabric scraps or felt.
Filling: Poly-fil or cotton batting will give your bunny a plump and cuddly shape.
Thread: Select a thread color that matches your fabric, or use a contrasting color for a decorative touch.
Needle: A sharp needle will help you sew the bunny’s body parts together securely.
Scissors: You’ll need sharp scissors to cut out the fabric pieces and trim any excess.
Other materials: Consider adding accessories to your bunny, such as ribbon for a bow tie, googly eyes for a playful expression, or a carrot for a festive touch.

3. DIY Bunny Ears for a Festive Headband Extravaganza
Prepare to embark on a delightful crafting adventure with this step-by-step guide to creating adorable bunny ears for a festive headband.
Materials:
- Felt (preferably white and pink)
- Scissors
- Fabric glue
- Headband (preferably plastic)
- Embroidery thread (optional)
- Sequins or beads (optional)
Instructions:
- Cut two oval shapes from the white felt for the bunny ears.
- Cut two smaller oval shapes from the pink felt for the inner ears.
- Glue the pink felt ovals onto the center of the white felt ovals.
- Fold the bottom edge of the ears over slightly and glue it to the top of the headband.
- Optionally, embroider or sew on sequins or beads for decoration.
Don your bunny ears headband and spread Easter cheer wherever you go!

4. Crafting Charming Bunny Garland for Springtime Cheer
Immerse yourself in the spirit of spring with an adorable Bunny Garland. Here’s how you can create this charming decoration in a few simple steps:
Materials:
- White felt
- Pink felt (for the ears)
- Black felt (for the eyes and nose)
- Fluffy cotton balls
- Needle and thread
- Scissors
- String
Instructions:
- Create the Bunny Bodies: Cut out oval shapes from the white felt to form the bunny bodies.
- Craft the Bunny Ears: Cut out long, pointed shapes from the pink felt and sew them onto the bunny bodies to create the ears.
- Add the Eyes and Nose: Cut out small circles from the black felt for the eyes and a triangle for the nose. Sew them onto the bunny bodies.
- Attach the Cotton Tail: Glue a fluffy cotton ball onto the back of each bunny body to create the tail.
- Assemble the Garland: Thread the string through the top of each bunny and secure it with a knot.
There you have it! A delightful Bunny Garland that will fill your home with springtime cheer.

5. Transforming Paper Plates into Hoppy Bunny Masks
Children will love creating these adorable bunny masks, and they’re perfect for Easter celebrations. With just a few simple supplies, you can transform ordinary paper plates into festive and whimsical bunny masks.
### **Materials:**
* **Paper plates**
* _Scissors_
* _Markers, crayons, or paint_
* _Pipe cleaners_
* _Glue_
* _Hole punch_
* _Yarn or elastic cord_
### **Instructions:**
1. **Cut the paper plate in half.** This will form the base of the bunny mask.
2. **Draw the bunny’s features.** Use markers, crayons, or paint to draw the bunny’s eyes, nose, mouth, and whiskers.
3. **Attach the pipe cleaner ears.** Cut two pipe cleaners into equal lengths and bend them into the shape of bunny ears. Glue the ears to the top of the mask.
4. **Create a hole for the nose.** Use a hole punch to create a small hole in the center of the mask, just above the nose.
5. **Thread the yarn or elastic cord through the hole.** This will allow the mask to be worn.
6. **Have fun decorating the mask!** Let your child use their imagination to add glitter, stickers, or other embellishments.

6. Creating Cute Bunny Tails for a Fuzzy Finishing Touch
To create the cutest bunny tails, you’ll need:
- Cotton balls
- White yarn
- Scissors
- Glue or a glue gun
Step 1: Form the Bunny Tail
1. Take three cotton balls and shape them into ovals.
2. Stack the ovals on top of each other, with the largest at the bottom and the smallest at the top.
Step 2: Wrap the Yarn
1. Cut a piece of white yarn about 2 feet long.
2. Starting at the bottom oval, wrap the yarn around the stacked cotton balls tightly, making sure to cover all the cotton.
3. Leave a few inches of yarn at the end for tying.
Step 3: Tie the Yarn
1. Bring the two ends of the yarn together at the top of the tail.
2. Tie the ends securely in a knot.
Step 4: Create the Furry Finish
1. Use the scissors to trim any excess yarn at the top of the tail.
2. Fluff up the cotton balls to create a fluffy tail.
3. Glue or hot-glue the tail to the back of your bunny craft.

7. Crafting Colorful Bunny Egg Holders for a Vibrant Easter Display
Prepare Your Materials:
Assemble felt sheets in various colors, craft glue, scissors, embellishments like googly eyes, pom-poms, and markers.
Create the Bunny Ears:
Cut two small ovals from contrasting felt colors. Glue the ovals together at the bases to form the bunny ears.
Construct the Bunny Head:
Cut an egg-shaped body from one felt sheet. Glue the bunny ears onto the top of the body.
Add Facial Features:
Use markers to draw whiskers, a mouth, and a nose on the bunny’s face. Embellish with googly eyes.
Prepare the Egg Holder:
Cut a rectangular strip of felt long enough to wrap around an egg. Glue or sew the strip together to form a loop.
Assemble the Egg Holder:
Place the egg inside the loop. Glue the bunny face onto the outside of the loop, making sure the ears are upright.
Optional Embellishments:
Add further decorations to the bunny egg holders with pom-poms, buttons, or ribbon, to enhance their appeal.

8. Making Adorable Bunny Treat Boxes for Sweet Treats
Materials:**
-White cardstock
-Pink cardstock
-Black marker
-Scissors
-Glue
Instructions:**
1. Cut out two large oval shapes from the white cardstock for the body and head of the bunny.
2. Cut out two smaller oval shapes from the white cardstock for the ears.
3. Cut out a small triangle from the pink cardstock for the nose.
4. Draw on the bunny’s eyes and mouth with the black marker.
5. Glue the ears to the head oval.
6. Glue the nose to the head oval.
7. Glue the head to the body oval.
8. Fold the bottom of the body oval up to create a box.
9. Glue the sides of the box together.
10. Fill the box with sweet treats.

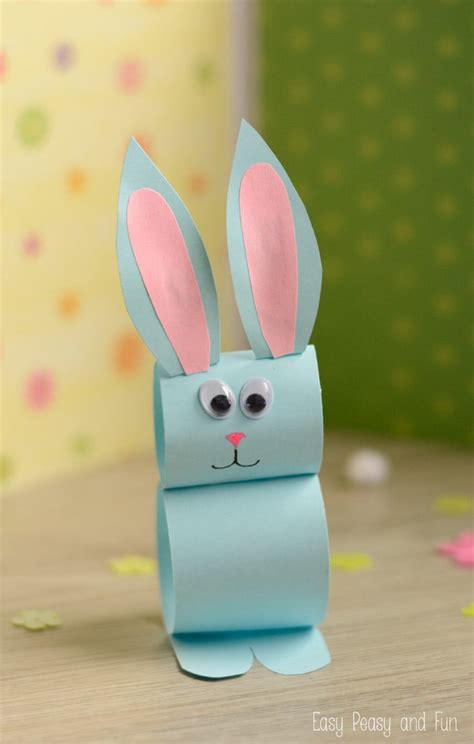
9. Repurposing Toilet Paper Rolls into Bunny-Themed Vases
Materials:
- Empty toilet paper rolls
- Scissors
- Cardstock or construction paper
- Markers or paint
- Glue
- Artificial flowers or greenery
Instructions:
1. Cut the toilet paper roll into a bunny shape. This can be done by cutting the roll in half, then cutting out two ears and gluing them to the top.
2. Decorate the bunny as desired. Use markers or paint to draw on eyes, a nose, and a mouth. You can also cut out ears and feet from cardstock or construction paper and glue them on.
3. Fill the bunny with artificial flowers or greenery. This will create a cute and festive Easter decoration.
Tips:
* You can use different colors and patterns of cardstock or construction paper to create different looks.
* You can also add other embellishments to the bunnies, such as ribbons or bows.
* These bunnies are a great way to use up empty toilet paper rolls and create a unique Easter decoration.

10. Showcase Your Easter Bunny Masterpieces
Let your little ones’ creativity soar with these adorable Easter bunny crafts. From fluffy pom-pom bunnies to whimsical sock bunnies, there’s something for every skill level.
Pom-Pom Bunnies: Fluff up some colorful yarn into adorable pom-pom bunnies, adding charming details like button eyes and felt ears.
Pipe Cleaner Bunnies: Twist and shape pipe cleaners into playful bunnies, complete with floppy ears and twitchy whiskers.
Paper Plate Bunnies: Design whimsical bunnies on paper plates, using markers, crayons, and stickers to create unique expressions.
Soda Bottle Bunnies: Repurpose plastic soda bottles into furry bunnies, wrapping them in yarn or felt and adding fluffy ears.
Sock Bunnies: Give old socks a new life as cuddly bunnies, stuffing them with cotton and adorning them with googly eyes and button noses.
Egg Carton Bunnies: Transform egg cartons into cute and colorful bunny families, painting and decorating them with details.
Popsicle Stick Bunnies: Craft sturdy bunnies from popsicle sticks, gluing them together and embellishing them with paint, markers, or stickers.
Origami Bunnies: Fold and crease paper into intricate origami bunnies, showcasing your patience and precision.
Clothespin Bunnies: Create playful bunnies using clothespins as the body and felt or paper for the ears and tails.
Beaded Bunnies: String colorful beads onto pipe cleaners, forming adorable bunny shapes with fluffy pom-pom tails.
